Meshtastic Range Test: Mapping Your Mesh
Meshtastic Range Test
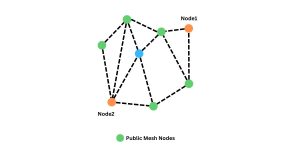
In the ever-evolving landscape of communication technologies, mesh networks stand out as a resilient and adaptable solution, especially in areas with limited infrastructure or during emergencies where traditional networks may fail. Meshtastic, a burgeoning player in the realm of mesh communication, offers an intriguing feature: the Range Test Module. This module allows users to conduct node-to-node range testing, providing valuable insights into the reach and effectiveness of their local mesh network.

Understanding Meshtastic Range Test
Meshtastic’s Range Test Module empowers users to visually map their mesh network’s coverage. The process involves deploying two nodes: one stationary and another mobile with GPS capability. The stationary node continuously sends out pings at regular intervals, while the mobile node records these pings from various locations, creating a comprehensive dataset.
Conducting a Range Test
To embark on a Meshtastic range test, users need two nodes: a stationary one and a mobile one with GPS functionality. Here’s a step-by-step guide to conducting the test:
- Node Setup: Ensure both nodes are configured with the Meshtastic firmware and are operational.
- Enable Range Test Module: Activate the Range Test Module on both nodes through the Meshtastic interface.
- Stationary Node Configuration: Configure the stationary node to send out pings at desired intervals, typically every 60 seconds.
- Mobile Node Setup: Enable the mobile node to save data in a .csv file format.
- Execute Test: Move the mobile node to various locations within the mesh network’s range while it records the pings from the stationary node.
- Data Collection: Allow the test to run for a sufficient duration to gather significant data points.
Visualizing Results
Once the range test is completed, users can analyze the collected data to visualize their mesh network’s coverage. The following steps outline how to visualize the results using Google Earth:
- Export Data: Export the recorded ping data from the mobile node in .csv format.
- Import into Google Earth: Open Google Earth and import the .csv file containing the recorded data.
- Data Interpretation: Google Earth will display the ping data as points on the map, providing a visual representation of signal strength and coverage.
- Analysis: Analyze the mapped data to identify areas with strong signal coverage and potential areas for improvement.
Benefits of Range Testing
Range testing with Meshtastic offers several benefits:
- Visual Representation: Users can visually assess their mesh network’s coverage, making it easier to identify dead zones or areas with weak connectivity.
- Optimization Opportunities: By pinpointing areas with suboptimal coverage, users can strategically deploy additional nodes or make adjustments to existing ones to enhance network performance.
- Real-World Validation: Range testing provides empirical data on the effectiveness of the mesh network in real-world conditions, offering insights that theoretical simulations may not capture.
- Community Engagement: Sharing range test results within the Meshtastic community fosters collaboration and knowledge sharing, benefiting users worldwide.
Meshtastic Range Test: Mapping Your Mesh
Meshtastic’s Range Test Module offers users a powerful tool to assess and visualize their mesh network’s coverage. By conducting node-to-node range tests and analyzing the results using tools like Google Earth, users can optimize their mesh networks for maximum effectiveness. As mesh communication continues to gain traction, tools like Meshtastic’s Range Test Module will play a crucial role in ensuring robust and resilient communication infrastructures, particularly in remote or challenging environments.
Converting a 144/430 VHF/UHF antenna to 868MHz for use with Meshtastic
Converting a 144/430 VHF UHF antenna to 868MHz for Meshtastic...
Read MoreMeshtastic Messenger – The Licence Free Off Grid Communication Platform
Meshtastic Messenger – The Licence Free Off Grid Communication Platform...
Read MoreMeshtastic Quick Chat Messages
Meshtastic Quick Chat Messages Enhancing Communication Efficiency with Quick Chat...
Read More


